Sunday, April 24, 2011

Wood


Well, do you know, I've been sitting here for about ten minutes trying to work out what I want to say.  And then eventually I realised I don't really want to say much about anything except our firewood.  This may make for a dull post, I suppose.  But it's exciting to me!

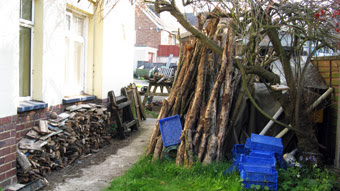
First of all, here's the final woodstack by the gate.  See how the pedestrian gate is completely obliterated (not that we use it) and the big gate not able to go all the way open.


Then around the side of the house there was more wood, sawn up but not stored in the woodshed as it was collected during the time we were actually taking dry wood from the shed to burn.  More trunks stacked up against a pile of wood sat beside the blue shed.

The weather has of course been unseasonably warm for a while but M decided at the beginning of the week that it was time to saw wood while we were still being promised warmth and no rain.  He pointed out that he can plumb the greenhouse if it rains and I agreed that getting the wood sawn would be a more than justifiable interruption to the greenhouse.

He has a sawbench but for a large part of the job decided to use the old wooden table we've got parked outside the green shed for just such outdoor work purposes.


And so he set to work.  And was sensible!  Paced himself, came in for breaks without being nagged, drank plenty, had bath every evening.  

Things didn't go entirely smoothly.  At one point quite  a chunk of a wall of stacked logs fell down.  They were sliding for a while, M said, and he was trying to get other walls of logs against them before they fell.  He was all for leaving the lot where it landed and stacking on top but I managed to get him to stop doing that after a short while on the grounds that I would do the re-stacking.  I like stacking logs.  Once I'd got that far, I continued to do the rest of the stacking.  I should say that M was still responsible for most of the stacking.

Anyway.  No more woodstack by the gate.


And none against the wall of the house, though still some left stacked against the blue shed.  Nothing like as much as there was, however.


And of course you're dying to see where it all is now, aren't you?
Ta-da!

I'm disappointed with this photo because it really doesn't convey how impressive the woodshed is.  The wood is stacked up to the rafters apart from the bit you see on the left right next to the shed.  This is partly because it has to be further back there to allow for the shed door to open.  If you look at the post for June 16th 2010 you can see how much we had last year.  What you're looking at last year is the view from inside the woodshed pointing towards what you see here on the right.  This time, inside the woodshed consists of wood and just a metre square standing space.

 
Isn't firewood lovely?

And - if you look carefully at the picture of the side of the house sans firewood, you'll see a well-swept, tidy path.  M set about this task all on his own.  I kid you not!  J & J if reading may need to sit down to recover from the shock of their dad not only finishing a task completely but voluntarily wanting to tidy up at the end.  I know I do.

Tuesday, April 19, 2011

A little bit of alchemy - part 2


The science of glazes is, well, very scientific.  Many years ago I attended a course on glazing with Mike Bailey as a guest tutor.  Mike used to be one of the potters at Bath Potters Supplies, where potters from surrounding counties go not only for materials and equipment but for valuable advice.  Mike was always the one to ask about glazes.  As a tutor he was informative, thorough, inspiring and enthusiastic not only about what he was telling us but about what we were asking him.

As I have mentioned before, much of what I know about potting I have learned from Douglas Phillips (on whose glazing course Mike was the visiting tutor) and because he uses the once-fire or raw glaze method, so do I.  This means that instead of firing pots first so that they are 'cooked', (called 'biscuit' firing and the pots are then biscuit ware) before glazing and then re-firing to a higher temperature, I glaze the bone-dry pots and then fire once.  This saves fuel, naturally, and time.  Why would one do any different? Well, there are disadvantages to raw glazing.  The glazes are often very different from other glazes because they need to contain a certain percentage of clay in order for the glaze to 'fit' the pots.  When glazing unfired pots, any unevenness in the pot can create a stress when the water from the glaze is quickly absorbed into the pot.  You can easily imagine that in a thin section the clay becomes saturated (and therefore swells) while in a thicker section it does so much less.  So you can get pots cracking when you glaze them because of this.  Or when you fire them.

Then, there's the glaze recipes themselves.  The best way I can think of to explain this to those who know nothing is to liken a glaze recipe to a cake recipe.

You want to make a cake.  You have in mind a sponge.  You know roughly the proportions of fat, sugar, eggs and flour.  If that were a glaze recipe, though, then this classification by ingredient would be very primitive.  No, what you are required to judge is the correctly proportions (correct, mind you, not rough) of protein, fat, carbohydrate, vitamins, minerals, water and fibre.

So, you find out how much fat there is in an egg.  Add that to the fat in the butter.  7 grams out.  Use a little less butter.  But butter contains a little protein and now you have disrupted the exact amount of protein you need.  Reduce the eggs by one and now you have far too little protein.  Oh well, let's make it into a walnut sponge.  Walnuts have protein in.  Yes, but they also have fat, which you had too much of in the first place.  Somewhere here is a balance of the number of walnuts and eggs and fat and then you can adjust the quantities of sugar and flour so that the proportions are right.  You are probably getting the idea now :)  Anyway, Mike Bailey taught us how to calculate these properties of the glaze using triaxial graphs.  It involved a lot of maths and I found it fascinating and hugely enjoyable.  Now I look at it all and I'm aware of two things - a) I've forgotten a lot of it through disuse because of lack of time, and b) I'm still fascinated with this kind of process.  You'll have gathered from previous posts that lack of time generally wins hereabouts.

Your regular potter, though, doesn't usually bother with all of this.  There are glaze recipe books.  Other people have done the science and then used the glazes and proved their worth, just as in cooking.  If you're no cook, you can buy premixed glaze ingredients where you just add water, just like packs of scone mix or sponge mix.  There's room for all of this in the wonderful world of pottery.

If you're a raw glazer, though, you are a specialist.  There are very few recipe books for raw glazes.  In fact, I don't actually know of any.  You will, though, find glazes in general books which either state that they can be used for raw glazes or look promising because of what you already know you need to include.  You can try these.  Most of them will not work for raw glazing.  Or, you can rely on the generosity of other potters to pass on their recipes.

I use two recipes dictated to us on courses at Ridge Pottery year after year.  The other two glazes I have adapted from one of Douglas' original glazes by playing around with the triaxial graph method, having read around the topic of the sort of colours I was trying to produce.

Only four glazes?  But we've seen many more than four colours on your pots!

Well spotted.  You have indeed.  And that's the alchemy.  Remember all those factors in the firing process.  Well, add that to four glazes combined with two different clays, a couple of coloured slips and some decorating glazes and you get the picture.

I expect you're a bit bored with all this technical stuff now.  Me, I could go on for ages.  Writing about things in this way gets me back in touch with aspects of the work that I sometimes neglect.  I'll spare your feelings, though, and stop here.  You've seen the photo at the top of this post.  You may remember there was a photo of some glazed pots in the previous alchemy post.  Well, they were the same pots.  Just to illustrate that what you see before the pots are fired often bears little resemblance to what they look like afterwards, here are the two pictures together.


Magic, isn't it?

Sunday, April 17, 2011

A little bit of alchemy - part 1

I know it's not alchemy and I know it's not magic.  I realise that to a scientist, it's just that when you mix certain minerals together and subject them to different physical conditions this will result in changes to the nature and appearance of those minerals.  However, I never got to even try the smallest taster of chemistry or physics at school so it's still possible for me to hang on to that little bit of mystery about what happens to clay and glazes when you fire them.

There are clays, glazes and firing methods which appear (to one who doesn't use them, anyway) to be able to produce fairly predictable results.   Mine are not among these.

The firing process is probably the single most unpredictable part of what I do.  I fire using gas, so that there is actual fire, flame, within the kiln chamber.  You get this with wood-firing, of course, which I love but would never have wanted to tackle myself.  I was lucky enough to spend a  week or two over a couple of years helping out at Ridge Pottery when I was still very much a learner myself and had the opportunity to fire a wood-fire kiln on several occasions.  It was daunting at first but by the second occasion I really loved the experience.  Of course I was overseen very carefully, but I still learned a tremendous amount about the process of turning malleable clay into vitrified pots as well as about wood-firing itself.

Wood firing is hard work.  It also requires plenty of storage space to season plenty of wood.  It's not for me.  However, the live flame you get from a gas firing can be the next best thing.


To explain this picture a little:
The lower part shows the kiln, with the light reflected very brightly off the front of the door, which explains the very light area on the left.  To the right of that is a metal shelving unit, dexion type.
Above the kiln at the back is a hood leading to a ventilation pipe.  The bright orange/red area you can see is a reflection on the inside of the hood of the inside of the chimney.  At this stage the colour of the atmosphere in the kiln will be much yellower as it is hotter. 
You can also see a blue area in about the centre of the picture.  This is flame emerging from the chimney of the kiln.  (The chimney in this case is not a tall, high thing but is an area at the back of the kiln which is only the height of the kiln itself.)


Live flames in the kiln chamber also allow you to manipulate the atmosphere in the kiln chamber so you get a process called 'reduction'.  Basically, you push too much flame too fast into the kiln so that it uses up all the available oxygen in the atmosphere and has to take more from the oxygen-bearing molecules in the clay.  At the same time, the flames will be escaping the kiln.  This is what's happening in the photo.

Reduction often results in a speckled appearance but it also often changes the actual base colour of the glaze. 

There are many other factors in the firing which induce variation in the finished results.  These include:
  • the exact position of the kiln shelves, both in relation to the burners and kiln walls and in relation to the pots.
  • the spacing of the pots
  • what types of shapes of pots are next to each other
  • which glazes are next to each other
  • whether your kiln is full of smaller pots or bigger pots
  • whether your shelves contain both smaller and bigger pots
  • the rate of climb of the temperature at every stage of the firing
  • whether the gas bottles need changing at a crucial stage and especially if you don't notice for a while!
 At this point some of you will be wondering why I fire by such a seemingly unpredictable method.  But maybe others will be thinking how exciting it all sounds!  Who wants predictabilty?  Well, of course, I do, to some extent.  Some of the problems I've been having with the work over the last year or so have been in trying to get to grips with how this particular kiln works best and then having got a long way in discovering that, in adapting what I do so that the differences in firing methods (tiny and subtle, but astonishing in their results) still produce results I want.

Goodness.  Sorry.  All very wordy.  But I really couldn't explain much about the firing process without.


Part 2 of "A little bit of alchemy" will be more about glazing.


Friday, April 15, 2011

Just because ...


...  I really like lime green.  I know it's been a bit of a gimmicky fashionable colour, but nonetheless, it appeals to me.  One of my artist friends, J, really hates it (though I suspect she might admit the colour of yer actual limes as different and not what she means by lime green) and because I really respect her enormously as an artist I sometimes catch myself wondering if lime green is some sort of modern construct and not a proper colour at all and I am letting the side down. 

I still like lime green, though.

Wednesday, April 6, 2011

The greenhouse project goes electric


Remember the greenhouse project?  You'd be forgiven for not doing so.  I guess for most people outdoor tasks ground to a halt once the frosty and then snowy weather set in and even after that an aluminium greenhouse is not a place to work in the winter.  By the time it might have been warm enough for M to start the wiring, we had both forgotten all the careful planning of how things were going to be attached so then M had to wait until I had a chunk of time to spend with him working it all out again.

Along with the mounting for the cables, we also had to plan out where to attach the patent shelves I've always used in a greenhouse.  This goes back to 1983, when I had a conservatory, and I've used the same method ever since.  Basically, you have two battens running from end to end of the greenhouse, supported on brackets.  They are spaced so that standard seed trays can straddle them.  When seedlings have been potted on and the seed trays removed, plants can grow up between the battens.

I bought brackets and little angle pieces with the greenhouse and all of these fit easily into channels in the main vertical struts of the greenhouse.  Unfortunately, there aren't these grooved struts in every part of the thing; some pieces are smooth, so we had to devise methods of support for the places where the brackets wouldn't go.

The photo above shows wiring in progress.  The one below shows it in use. 


We worked on the same principle as wiring up a house - imagine all the things you want to plug into sockets and then add at least one extra per room.  I wanted the light switch to be at the end nearest the back door of the house and the pottery, but M suggested a two-way switch so we can use the light as a yard light if we need one.  You can see here one light pull and two double sockets.

Once the wiring was finished it it seemed the greenhouse could be used, even though there are things about it not yet finished.  As it was my birthday, therefore, we had a greenhouse-warming party, pictures of which can be seen here.

Next, I have been putting up insulation.  I wanted to get this prepared while the greenhouse was not only dry but completely clean as I've used stick-on Velcro to attach it.  


The pieces of bubblewrap are cut to shape and then bound all round with duct tape.  It will be very quick to remove and replace at the beginning or end of a season.  Now, all we need is some plants .....